
Nodes Nodes Nodes
Well hear goes..
There's a long list of nodes for all sorts of things, there's a root node, seating nodes, pitcher, catcher, handle nodes, there's camera nodes and now even particle nodes (the list goes on)
The SketchUp to IMVU tutorial is all fine and dandy as long as you want basic static mesh's, but the second you want it more interactive such as something sounding as simple as sitting/standing spots then nodes are required.
For the up coming examples all nodes referred to should be in the example files that came with the MeshOut download made by AS himself!
P.S- all those that used the old MeshOut peeking at this, that wonderful little option that reads "Make Bones compatible" in MeshOut 0.4 will translate all old bones to the new ones and it dose it right and fast! so all your old files can easily be converted (you may want to make a backup before doing this just encase, beta version and all but i did test this feature on Hogwarts and it worked perfectly)
- Seating nodes basics
- The Nodes Explanation
Ok lets start small, for this example I am just going to use the Example Furniture that comes with the download.
In the file there is a root node which everything ties to (reference point for 3D stuff) but if its not present the axis will be used as a root.
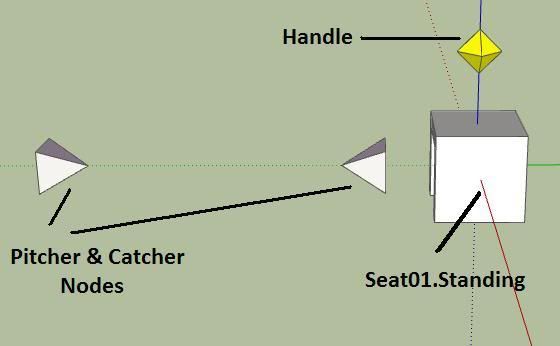
There are also Pitcher, Catcher, Handle and Seat nodes.
The Pitcher and Catcher nodes Must be kept the same distance apart that's why there grouped together. These are used for the position of both avis when your furniture is in use and they use a joint movement such as hug or kiss. You need to position them so that people do not look like there stuck in your mesh and keep them there set distance appart.
The Seat node is where the avi will be located. The 2 default variations of this node are Seat01.Sitting and Seat01.Standing and when you wish to add a custom pose you change the .sitting (or .standing) to another name you recognise and then link it in create mode as explained in the adding poses tutorial
To see the nodes name you must right click a node and click Entity Info on the node itself not a group of nodes, once clicked this box will stay up and any single item you clicked will be displayed within in.
You will notice that every node aside from the root node has a number in it. Each type of node must have a unique number, so you cannot have 3 nodes all named Seat01.Sitting in any item you make otherwise it will only show 1 seat. Fortunatly the latest version of MeshOut will re number them for you, so if you copy the 1 sitting node group and then use the auto numbering tool inside of MeshOut then it will work its magic re numbering them for you (every little bit to make it easyer!)
To use more than one you just increase the number and each number corresponds with the others of its same number, so Handle 01 will always direct to seat01 Handle 02 will always direct to Seat02 ect.
If you have copied and pasted the same node ensure you run the Renumber Pose Groups script that's in MeshOut's submenu
All nodes need to be half way thru the floor as the exporter puts there position at the groups axis's (which in this new version of MeshOut have been moved to the centre of there example nodes for you), each node you can easily click the central point. The only node this really dose not matter with is the Handle.
- Example standing spot
As mentioned I am going to use the Example Furniture file that comes with the exporter download. To use this single seat with any other mesh simply copy out all the nodes and put them into place where you want them and if you want more copy and past the seat group and remember to run the re number script for seats in the MeshOut script list.
Now simply place the Seat node where you want your avi to sit/stand. Make sure you position it where the X is half way down the node itself, as the very centre there is where your avi will be aliened to so the nodes are often half way thru the floor. You can turn the nodes in any direction and the avi will face that direction. Just make sure you don't alter the Pitcher and catcher nodes.
Ok now you hopefully understand the basics and have lined up the nodes correctly with your mesh. Now save it and export as you did before (by clicking Plugins, MeshOut, and the top Export option). Then just load it up into the previewer the same way we did last time. Remember the XSF nodes file to!
If all has gone well you should now have your mesh with nodes in the previewer! If so give yourself a pat on the back, well done to you!! ^_^
-Room Nodes
There's a lot more nodes needed when making rooms but its pretty much the same as before, just more nodes.
Nodes required to make a room are-
Camera nodes (pointing at the first seat location)
6 Seating nodes with pitcher and catcher nodes (whether standing or sitting)
Extra nodes that are useful in rooms-
Floor nodes
Wall nodes
Ceiling nodes
Lighting nodes (there's 2 types)
See-Through nodes
skeleton.Room
node.Room
In the Example Room file that comes with all these nodes except only 1 type of the lighting nodes is present and no node.Room or skeleton.Room as it will be rare you use these unless doing something more advanced.
After working out how to make a furniture item with more than one seat this should be simple as its the same thing only on a larger scale. The way in which you multiple seat nodes works with floor wall and ceiling nodes as they also have a reNumber script for each of them.
By the end all nodes must be uniquely numberd, you cannot have 2 nodes named exactly the same as it confuses IMVU.
In the example room it has 6 seating nodes already done for you as examples that can be used. It also has some floor nodes and wall nodes evenly spaced out to give you an idea of how your rooms will look with nodes giving you a good idea of how each must be named as they are all uniquely numbered ready for export.
Once your mesh is complete you can start placing nodes on it, it is advised to group all furniture nodes together as it makes it easier to edit each time and helps to keep track of it all.
The simplest way I know of to make lots of floor nodes is to grab one floor node and put it into place, then using the move tool hold down CTRL and click that floor node again, move it a distance away from the first node in one direction. After doing that just typing in x20 and it will copy that node another 20 times the same space apart, once you have enough in that direction you just highlight them all and do the same in the other direction and you quickly populate an area with floor nodes. Now you need to number every floor node so run the renumber furniture script from the MeshOut list,
Thank GOD for ApocalypseSurvivor !! and do keep in mind he made this for free so show him respect when you see him around!
-Happy to accept gifts of what you made to NEO1471 if you found this helpful ^_^
